Your Google Workspace account could be deleted in 21 days if you don’t verify your domain. That’s not a scare tactic—it’s Google’s actual policy.
But here’s the good news: domain verification takes just 10 minutes to set up. You’ll prove you own your domain, unlock all Workspace features, and protect your business from email hijacking.
I’ll walk you through everything step-by-step. No technical jargon. No confusion.
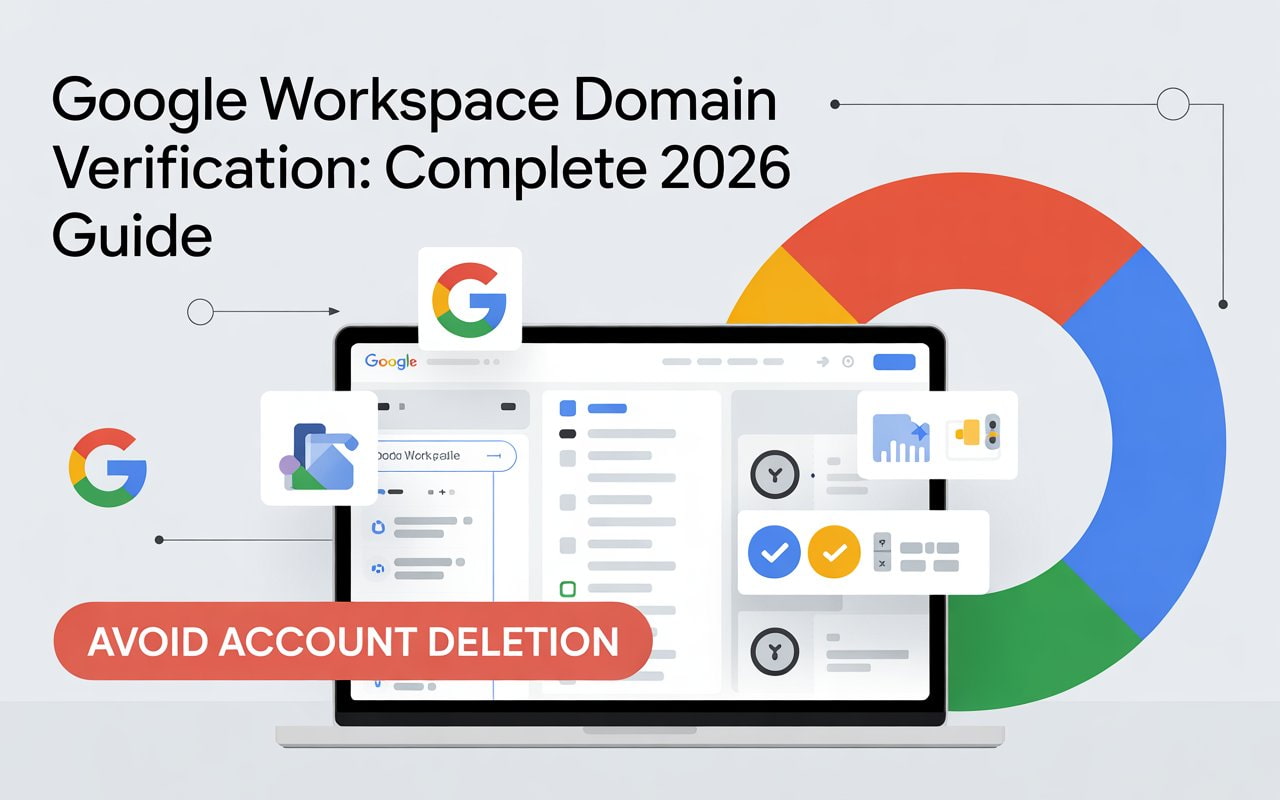
What Is Google Workspace Domain Verification?
Think of domain verification as showing your ID at a secure building entrance. Google needs proof you actually own your domain before letting you use it with their services.
Here’s what happens during verification:

You add a special code (called a TXT record) to your domain’s DNS settings. Google checks for this code. When found, they confirm you’re the legitimate owner.
Why You Can’t Skip This Step
Domain verification isn’t optional. It’s mandatory for three critical reasons:
1. Prevents Domain Hijacking
Without verification, anyone could create a Google Workspace account using YOUR domain name. They’d send emails that look like they’re from your business.
In 2024, a Chicago marketing agency lost $127,000 when fraudsters did exactly this. The scammers created fake billing accounts and invoiced real clients.
2. Unlocks Administrative Control
You can’t create user accounts, manage security settings, or use Gmail until verification completes. Everything stays locked.
3. Stops Account Deletion
Here’s the timeline if you don’t verify:
- Day 9 (trial accounts): Setup window closes
- Day 21: Account automatically DELETED
- All emails, files, and calendar data: GONE FOREVER
Google won’t recover it. There’s no grace period.
How Long Does Domain Verification Take?
Let’s be realistic about timing:
Setup Time: 5-10 minutes You’ll copy a verification code and add it to your DNS settings.
Propagation Time: 10 minutes to 48 hours Your TXT record needs to spread across global DNS servers. Most complete within 1 hour.
Factors That Speed Things Up:
- Major registrars like GoDaddy, Namecheap, Cloudflare (10-30 minutes)
- Low TTL values (300-600 seconds)
- Fresh domain registrations
What Slows Things Down:
- Small regional registrars (6-24 hours)
- High TTL values (24+ hours)
- Recent nameserver changes
I’ll show you how to check your DNS propagation status so you’re not left guessing.
The 4 Domain Verification Methods (Which Is Best?)

Google offers four ways to verify domain ownership. Here’s the honest truth about each:
Method 1: TXT Record Verification ⭐ (Recommended)
Success Rate: 99% Setup Time: 5-10 minutes Best For: Everyone
This is the gold standard. It works with every DNS provider, propagates quickly, and never breaks when you update your website.
When to use it: Always. Unless you literally cannot access DNS settings.
Method 2: CNAME Record Verification
Success Rate: 98% Setup Time: 5-10 minutes Best For: Alternative if TXT records have issues
Almost identical to the TXT method, but uses a different record type. Some DNS providers prefer this.
When to use it: If your DNS provider has TXT record limitations (rare).
Method 3: HTML File Upload
Success Rate: 85% Setup Time: 15-20 minutes Best For: Users with website hosting access but limited DNS access
You’ll upload a Google-provided file to your website’s root directory.
When to use it: You control website files but not DNS settings.
Limitations:
- File must stay on server permanently
- Website redesigns might delete it
- Requires an active website
💡 Need help setting up Google Workspace?
We’re certified Google partners offering 64% off + free professional setup ($2,000 value). Used by 151+ companies.
Get your quote →Method 4: Meta Tag Verification
Success Rate: 85% Setup Time: 10-15 minutes Best For: Users who can edit website HTML
You’ll add a verification tag to your homepage’s head section.
When to use it: You can edit HTML but don’t have file upload access.
Limitations:
- Only verifies homepage
- Theme updates might remove tag
- Requires HTML knowledge
Bottom Line: Use the TXT record method. It’s proven, reliable, and works universally.
Step-by-Step: How to Verify Your Domain (TXT Method)
Here’s exactly what you’ll do. I’ve broken it into simple steps.
Before You Start
Make sure you have:
- Your Google Workspace admin login
- Domain registrar credentials (where you bought your domain)
- Access to DNS settings
- 15 minutes of focused time
Step 1: Get Your Verification Code
- Sign in to Google Admin Console at admin.google.com
- Click the menu icon (≡) in the top left
- Go to: Account → Domains → Manage domains
- Click “Verify domain” next to your domain name
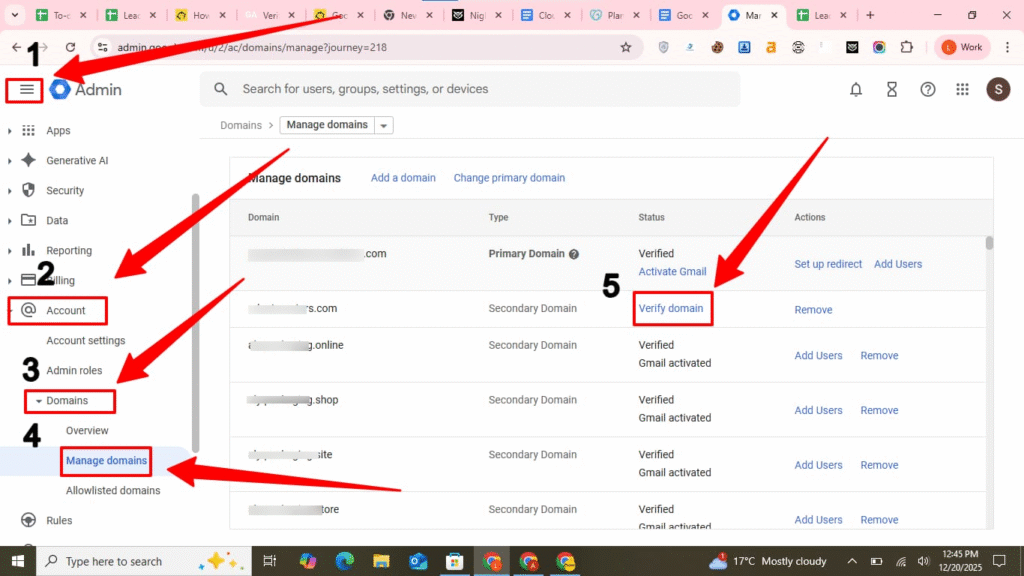
5. Click “Get started” in the setup wizard
6. Select your domain registrar from the dropdown
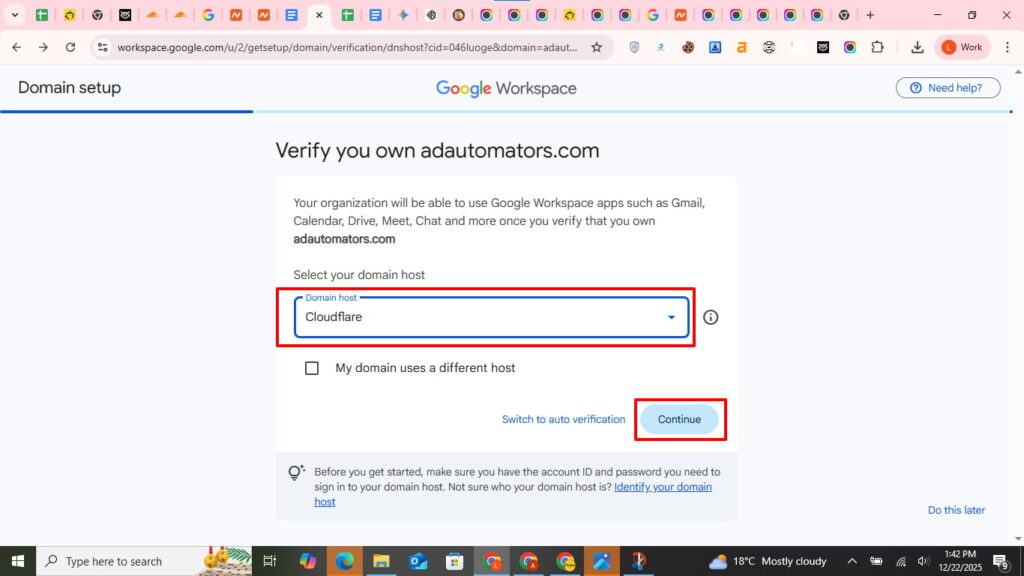
7. Click “Continue“
You’ll see a unique code starting with: google-site-verification=
Copy this entire code. Keep the window open—you’ll need it again.
Step 2: Add the TXT Record to Your DNS Settings
Now you’ll prove you own the domain. The interface varies by provider, but the concept stays the same.
If You Use GoDaddy:
- Sign in to your GoDaddy account
- Go to: My Products → Domains
- Click your domain → DNS
- Find “Records” section
- Click “Add” button
- Select: Type = TXT
- Enter:
- Name: @
- Value: [paste your verification code]
- TTL: 600 seconds
- Click “Save”
Need detailed screenshots? Check our complete GoDaddy domain verification guide.
If You Use Namecheap:
- Sign in to Namecheap
- Domain List → Manage
- Advanced DNS tab
- Scroll to “Host Records”
- Click “Add New Record”
- Select: Type = TXT Record
- Enter:
- Host: @
- Value: [paste verification code]
- TTL: Automatic
- Click green checkmark
- Click “Save All Changes” at bottom (important!)
Namecheap-specific tips? See our Namecheap verification walkthrough.
If You Use Cloudflare:
- Sign in to Cloudflare
- Select your domain
- Click “DNS” in top menu
- Click “Add record”
- Enter:
- Type: TXT
- Name: @
- Content: [paste verification code]
- TTL: Auto
- Proxy status: DNS only (gray cloud)
- Click “Save”
Cloudflare verifies fast (usually 5-15 minutes). Get our Cloudflare-specific guide here.
For Other Domain Registrars:
The fields might be labeled differently, but you’re looking for:
| Field | What to Enter |
| Type/Record Type | TXT |
| Name/Host/Hostname | @ (or leave blank) |
| Value/Data/Answer | Your complete verification code |
| TTL | 3600 or Automatic |
Step 3: Verify in Google Admin Console
- Return to the Admin Console window you left open
- Select: “Come back here and confirm”
- Click the “Confirm” button
- Google immediately checks for your TXT record
Three Possible Outcomes:
✅ Success: “Your domain has been verified!” You’re done. Move to the post-verification steps below.
⏳ Pending: “We couldn’t verify your domain” Don’t panic. DNS changes take 10 minutes to 48 hours to propagate. Wait 15 minutes and click “Verify” again.
❌ Error: Still failing after 2 hours Jump to the troubleshooting section below.
Step 4: Confirm Your Domain Status
Double-check everything worked:
- Go to: Admin Console → Account → Domains → Manage domains
- Look at the “Status” column
- You should see: ✅ Green checkmark + “Verified”
If it says “Pending,” wait a bit longer and refresh.
Troubleshooting: When Domain Verification Fails
Here are the most common issues and their fixes.
Issue #1: “We Couldn’t Verify Your Domain”
Most Common Cause: DNS propagation hasn’t finished yet.
Fix:
- Wait 30 minutes
- Check DNS propagation at whatsmydns.net
- Enter your domain and select “TXT” as record type
- Look for your google-site-verification code
- If it’s not showing globally, wait longer
- Try verification again in Admin Console
Issue #2: “Domain Verification Record Not Found”
Likely Causes:
- TXT record added to subdomain instead of root domain
- Wrong Host field (used “www” instead of “@”)
- Typo in verification code
Fix:
- Go back to your DNS settings
- Verify Host is exactly @ (not www, not mail, not blank)
- Check your verification code has no extra spaces
- Must include the full google-site-verification= prefix
- Save changes and wait 10 minutes
- Retry verification
Issue #3: Cloudflare Changed My Record
What Happened: Cloudflare automatically changes @ to your full domain name.
Fix: This is NORMAL. Don’t change it back. Cloudflare does this automatically and verification will still work.
Also check: Your TXT record should show “DNS only” (gray cloud icon), not “Proxied” (orange cloud).
Issue #4: Namecheap Record Not Saving
What Happened: You forgot to click “Save All Changes” at the bottom.
Fix: Namecheap requires TWO clicks:
- Green checkmark next to the record
- “Save All Changes” button at page bottom
Both must be clicked for changes to take effect.
Issue #5: Verification Stuck After 48 Hours
Possible Causes:
- Very high TTL value (86400 seconds = 24 hours)
- Multiple conflicting TXT records
- Nameserver issues
Fix:
- Lower your TTL to 300 seconds (5 minutes)
- Delete any old Google verification records
- Keep only the newest TXT record
- Verify nameservers point to correct DNS provider (use who.is)
- Wait for old TTL to expire
- Retry verification
What to Do AFTER Domain Verification (Don’t Skip This)
Most guides stop at verification. Big mistake. You’re not done yet.
Critical Next Steps
1. Set Up MX Records for Email
Your domain is verified, but you can’t receive emails until MX records are configured.
Add This Single Record (2025 simplified method):
Type: MX
Host: @
Points to: smtp.google.com
Priority: 1
TTL: 3600
2. Enable Email Authentication
This prevents your emails from landing in spam folders.
SPF Record:
Type: TXT
Host: @
Value: v=spf1 include:_spf.google.com ~all
DKIM Record:
- Admin Console → Apps → Google Workspace → Gmail
- Click “Authenticate email”
- Generate DKIM key
- Add the provided CNAME records to your DNS
DMARC Record:
Type: TXT
Host: _dmarc
Value: v=DMARC1; p=quarantine; rua=mailto:admin@yourdomain.com
Result: 95% inbox placement rate instead of 50%.
3. Create User Accounts
Now you can add your team:
- Admin Console → Directory → Users
- Click “Add new user”
- Enter name and email
- Set temporary password
- Send welcome email
4. Enable Two-Factor Authentication
Protect your accounts from hijacking:
- Admin Console → Security → 2-Step Verification
- Click “Enforce” for all users
- Set grace period (recommend: 30 days)
Provider-Specific Guides for Faster Setup
Each domain registrar has slightly different interfaces. We’ve created detailed guides for the most popular ones:
Using GoDaddy? → Complete GoDaddy verification guide with screenshots
Using Namecheap? → Step-by-step Namecheap verification walkthrough
Using Cloudflare? → Cloudflare domain verification guide (includes common errors)
These guides include:
- Provider-specific screenshots
- Common mistakes to avoid
- Platform-specific troubleshooting
- Exact field names and locations
- Time estimates for that provider
Common Domain Verification Mistakes (And How to Avoid Them)
Mistake #1: Deleting the TXT Record After Verification
Why It’s Bad: Your domain becomes unverified again. Services stop working.
What to Do: NEVER delete your Google verification record. Keep it permanently.
Mistake #2: Missing the 9-Day Deadline
Why It’s Bad: Trial accounts can’t complete setup after day 9.
What to Do: Set a calendar reminder on day 2 of your trial. Don’t wait.
Mistake #3: Adding Record to Subdomain
Why It’s Bad: Google checks the root domain, not subdomains.
What to Do: Always use @ for the Host field. Never use www, mail, or anything else.
Mistake #4: Forgetting MX Records
Why It’s Bad: Domain verification succeeds, but email doesn’t work.
What to Do: Immediately configure MX records after verification. Don’t skip this step.
Mistake #5: Skipping Email Authentication
Why It’s Bad: Your emails go to spam. Deliverability tanks.
What to Do: Set up SPF, DKIM, and DMARC records. This takes 10 extra minutes and dramatically improves inbox placement.
Frequently Asked Questions About Google Workspace Domain Verification
How long does Google Workspace domain verification take?
Setup takes 5-10 minutes. DNS propagation takes 10 minutes to 48 hours, with most completing within 1 hour. Check propagation status at whatsmydns.net to see when your TXT record is live globally.
Can I use Google Workspace without domain verification?
No. Domain verification is mandatory. You cannot access Gmail, Drive, Calendar, or any Workspace services without it. You also can’t create user accounts or manage security settings.
What happens if I don’t verify my domain?
Your account gets automatically deleted 21 days after signup. All emails, files, and calendar data are permanently lost. Google won’t recover deleted accounts—verification is non-negotiable.
Which verification method is most reliable?
The TXT record method has a 99% success rate and works with all DNS providers. It’s faster, more secure, and doesn’t break when you update your website. Use this unless you literally cannot access DNS settings.
How do I check if my domain is verified?
Sign in to Google Admin Console, go to Account → Domains → Manage domains, and check the Status column. A green checkmark and “Verified” status means you’re all set. “Pending” means it’s still processing.
Why is my domain verification failing?
The most common reason is DNS propagation delay—your TXT record hasn’t spread globally yet. Wait 30 minutes and try again. Other causes: typo in verification code, wrong Host field (should be @), or record added to subdomain instead of root domain.
How do I verify a domain on Google Workspace?
Sign in to Admin Console, get your TXT verification code, add it to your domain’s DNS, and confirm in Google Workspace.
How long does it take to verify a domain in Google Workspace?
Setup takes 5–10 minutes, and DNS propagation usually completes within 10 minutes to 48 hours.
How to do domain verification?
Use the TXT record method in your domain registrar’s DNS settings, then confirm verification in Admin Console.
Why is my domain not eligible for Google Workspace?
Domains must be fully registered and not already in use with another Workspace account to qualify.
Why is my domain not verifying?
Common causes: DNS propagation delays, incorrect TXT code, wrong host field, or added to a subdomain instead of root.
Can I bring my domain to Google Workspace?
Yes, you can add and verify any domain you own in Admin Console to use with Workspace services.
How long do domains take to verify?
Typically 10 minutes to 48 hours depending on DNS propagation and registrar speed.
What happens to Google Workspace if the domain expires?
Your Workspace account can be suspended or deleted, and email, Drive, and Calendar data may become inaccessible.
What is the purpose of domain verification?
To prove domain ownership, unlock Workspace features, prevent hijacking, and avoid account deletion.
How do I get Google to verify my business?
Add the TXT record provided in Admin Console to your DNS and click “Verify” in Workspace.
How to check if a domain has been verified?
Go to Admin Console → Account → Domains → Manage domains; a green checkmark and “Verified” status confirms verification.
Final Checklist: Is Your Domain Verification Complete?
Use this checklist to make sure you didn’t miss anything:
During Verification:
- Copied complete verification code (includes google-site-verification=)
- Added TXT record to root domain (Host = @)
- Saved changes at domain registrar
- Waited at least 15 minutes for DNS propagation
- Successfully verified in Admin Console
- Confirmed green checkmark in domain status
After Verification:
- Configured MX records for email delivery
- Set up SPF record for sender authentication
- Generated and added DKIM keys
- Created DMARC policy
- Created user accounts for team members
- Enabled two-factor authentication
- Tested email sending and receiving
Ongoing:
- NEVER delete your Google verification TXT record
- Monitor email deliverability monthly
- Renew domain registration before expiration
- Review security settings quarterly
Take Action Now: Verify Your Domain Today
You now have everything you need to successfully verify your Google Workspace domain. The process is straightforward when you follow the right steps.
Remember the critical deadline: 21 days for paid accounts, 9 days for trial accounts. Don’t wait and risk losing your account.
Next Steps:
- Sign in to Google Admin Console right now
- Get your verification code
- Add the TXT record to your DNS settings
- Use our provider-specific guides for help:
- Complete the post-verification security steps
Domain verification protects your business from email hijacking, unlocks full Workspace features, and prevents account deletion. It takes 10 minutes. Do it today.
Need Help? Drop a comment below and I’ll personally guide you through any stuck points.
Get Google Workspace at 64% Off
Same service. Better price. Professional setup included.
⭐⭐⭐⭐⭐ 151+ companies trust us
Partner Pricing:
• Business Starter: $3/month (Google: $8)
• Business Standard: $13/month (Google: $17)
• Business Plus: $20/month (Google: $26)
FREE:
Complete DNS setup + 24/7 support + USA IPs
15-user minimum | Setup in 24 hours