You’ve got Google Workspace running at your company. Great choice. But now you’re staring at the admin console for Google Workspace, wondering where to even start.
Don’t worry you’re not alone. We’ll walk through everything you need to know, from your first Google Workspace admin console login to managing hundreds of users like a pro.
What Is the Google Workspace Admin Console?
Think of the console admin Google workspace as mission control for your entire organization. It’s where you manage every user, lock down security, and control who can access what.
You’ll find it at admin.google.com. That’s your home base for everything from adding new employees to stopping security threats before they happen.
Here’s what you can actually do inside the Google admin console workspace:

- Add, remove, and manage user accounts
- Set up two-factor authentication (2FA) to protect your data
- Control access to Gmail, Drive, Calendar, and Meet
- Monitor who’s doing what with detailed reports
- Manage mobile devices accessing your company data
- Configure email security settings like DKIM and SPF
The best part? You don’t need any software installed. Just open your browser and go.
How to Access Google Workspace Admin Console (3 Simple Methods)
Let’s get you logged in. Here are three ways to reach the Google admin workspace console.
Method 1: Direct URL (Fastest)
Open any browser and type admin.google.com in the address bar. That’s it.
You’ll need to sign in to Google Workspace admin console using your admin email. Important: this won’t work with a regular Gmail account (@gmail.com). You need your company email like admin@yourcompany.com.
💡 Need help setting up Google Workspace?
We’re certified Google partners offering 64% off + free professional setup ($2,000 value). Used by 151+ companies.
Get your quote →Method 2: Through Google Apps Menu
Already signed into your workspace admin console Google account? Click the grid icon (nine dots) in the top right corner of any Google page.
Look for “Admin” in the menu. Click it. You’re in.
This option only shows up if you’ve got admin privileges. Regular users won’t see it at all.
Method 3: Mobile App
Download the Google Admin app from your phone’s app store. It’s perfect for quick tasks like resetting passwords or approving device access when you’re away from your desk.
The mobile app handles most day-to-day admin tasks, but you’ll still need the web version for advanced settings.
Your First Google Workspace Login Admin Console: What to Expect
Just completed your admin console Google Workspace login? Here’s what you’re looking at.
The dashboard shows five key boxes right up front:
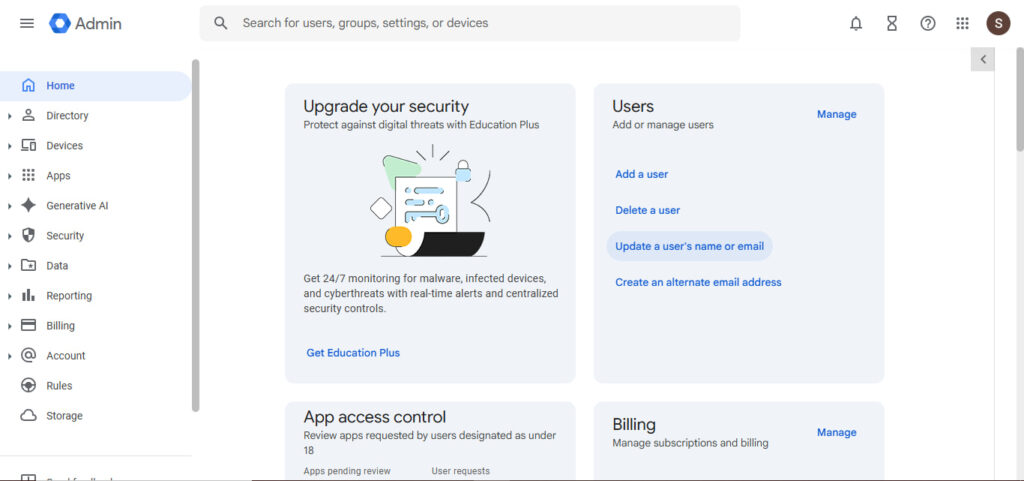
Users: See how many accounts you’ve got, who’s new, and who’s been deleted recently. Quick actions let you add or remove users with one click.
Billing: Check your subscription, see how many licenses you’re using, and when your next payment’s due.
Security Alerts: This is where urgent issues pop up. Keep an eye on this one.
Product Updates: Google’s always adding new features. This box keeps you in the loop.
Domains: Manage your company’s domain name and verify ownership.
The left sidebar is where the real work happens. That’s your navigation menu for users, security, devices, reports, and billing.
Managing Users in the Google Workspace Admin Console
Adding and managing people is probably why you’re here. Let’s make it simple.
Add a Single User
Navigate to Directory > Users. Click “Add new user”
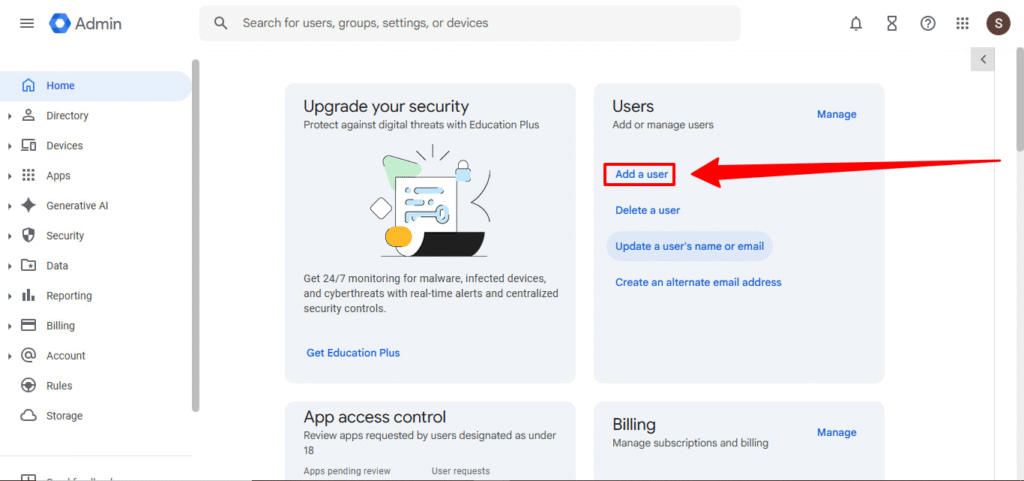
and fill in the basics: first name, last name, and email address.
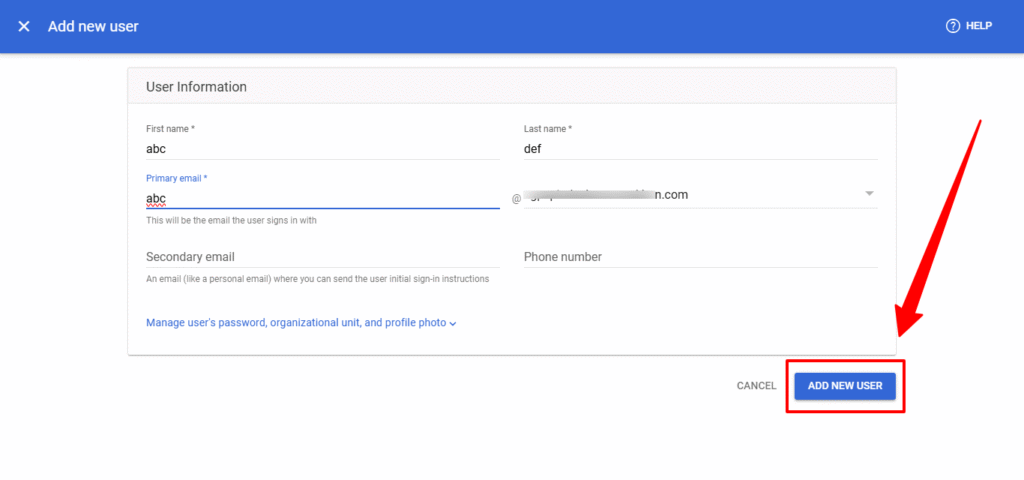
You can auto-generate a password or create your own. The system displays the login details right there email them to your new user or share them securely another way.
Takes about 30 seconds per person. For team communication, consider setting up shared mailboxes and organizing users with groups management
For advanced user and group management techniques, see our detailed guide on Google Workspace Groups Management:
http://leadsmonky.com/google-workspace-groups-management-2026/
Google Workspace Bulk Add Users CSV Admin Console (The Fast Way)
Got 10, 50, or 200 people to add? Don’t do it one by one.
Here’s how to use the Google Workspace bulk create users CSV admin console feature:
- Go to Directory > Users
- Click “Bulk update users”

3. Download the CSV template Google provides
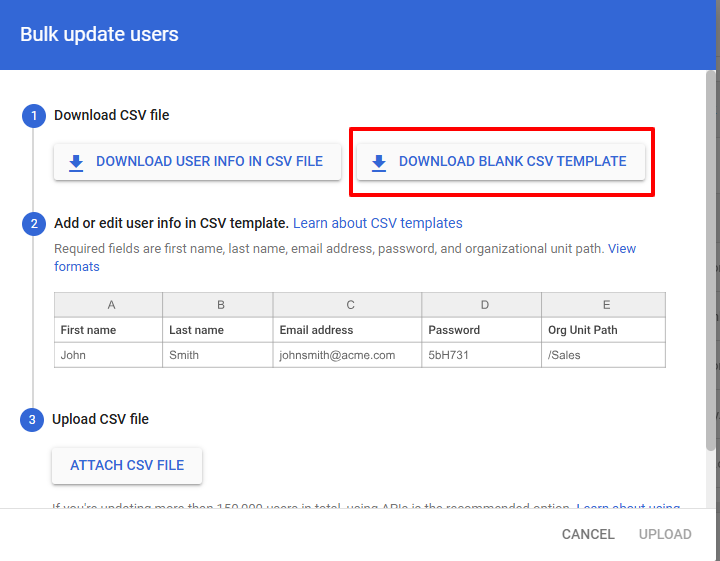
4. Fill in your user info (name, email, password)
5. Upload the file back to the Google Workspace bulk upload users CSV admin console
6. Review and confirm
Test with 5-10 users first. Once you’ve got the format right, you can upload hundreds at once.
This saves hours compared to manual entry.
Reset Passwords (Without the Hassle)
Users forget passwords. It happens constantly.
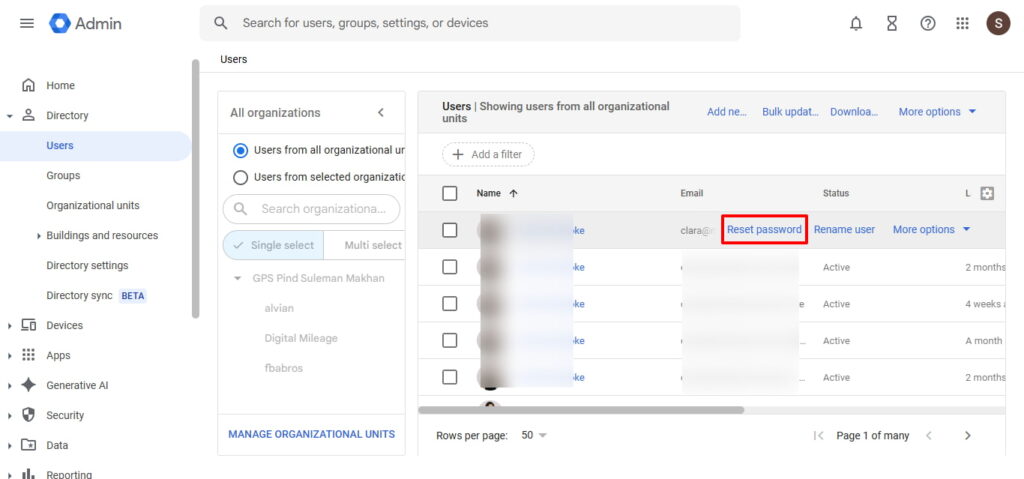
Click on any user’s name, hit “Reset password,” and choose whether to auto-generate or create a custom one. Decide if they need to change it at next login (usually smart for security).
Send them the new password securely. Done in 15 seconds.
Locking Down Security: Essential Settings You Can’t Skip
Security isn’t optional anymore. Here’s what you need to configure in your Google Workspace admin console right away.
Enable Two-Factor Authentication for Everyone

Go to Security > Authentication > 2-Step Verification. Turn on enforcement for all users.
Give people a week or two to enroll, then make it mandatory. This one setting stops 99% of account takeovers.
For comprehensive protection, read our complete guide on Google Workspace two-factor authentication and security solutions
Choose which methods to allow: authenticator apps (recommended), security keys (most secure), or Google prompts. Avoid SMS codes—they’re the easiest to hack.
Allow Users to Generate App Passwords Google Workspace Admin Console (For Legacy Apps)
Some older apps can’t handle modern login. That’s where app passwords come in.
Navigate to Security > Less secure apps. You’ll see the option to enable app passwords Google Workspace admin console.
Here’s how to allow users to generate app passwords admin console Google Workspace:
- Go to Security > App passwords
- Toggle the setting to “Allow users to manage their app passwords“
- Users can then create app-specific passwords for tools like Outlook or Thunderbird
Only enable this if you absolutely need it. App passwords bypass 2FA, which creates a security gap.
Set Up Google Workspace DKIM Setup Admin Console (Stop Email Spoofing)
DKIM proves your emails actually come from you. Without it, your messages might land in spam folders or get rejected entirely.
Here are the Google Workspace DKIM authenticate email admin console steps:
- Navigate to Apps > Google Workspace > Gmail
- Click “Authenticate email“
- Select your domain
- Click “Generate new record“
- Copy the TXT record Google provides
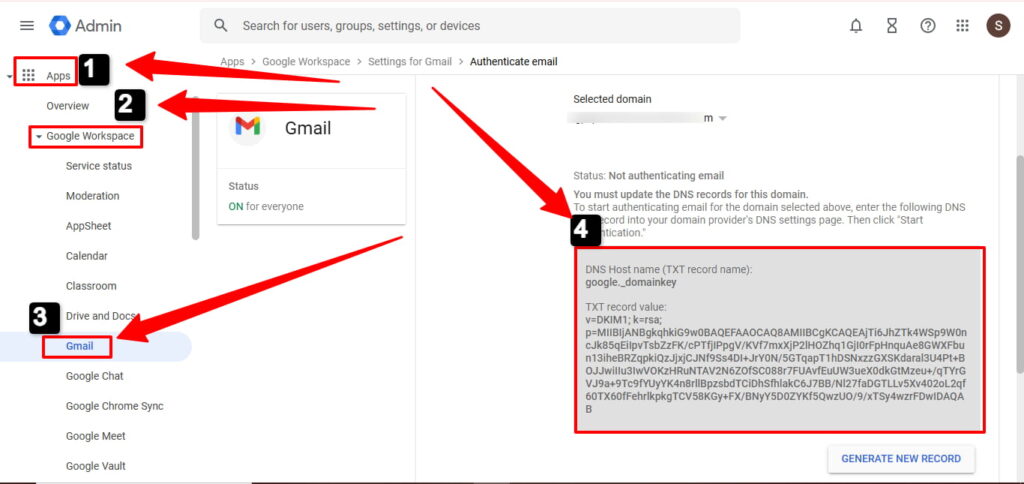
- Add it to your domain’s DNS settings (at your domain registrar)
- Come back to the Google Workspace DKIM setup authenticate email admin console steps and click “Start authentication“
Wait up to 48 hours for DNS propagation. Once verified, your emails get a trust badge that improves deliverability.
The generate DKIM keys Google Workspace admin console authenticate email process sounds technical, but most domain providers make adding DNS records pretty straightforward.
Advanced Email Settings You’ll Actually Use
How to Set Email Forwarding in Google Workspace Admin Console
Want emails sent to one address to automatically forward somewhere else? Here’s how.
Go to Apps > Google Workspace > Gmail > Default routing. Click “Configure” or “Add another.“
Set up your rule:
- Who it applies to (specific users, groups, or everyone)
- Where to forward the emails
- Whether to keep a copy in the original inbox
This is perfect for team@ or support@ addresses that multiple people need to monitor.
Configure Automatic Email Signatures
Navigate to Apps > Google Workspace > Gmail > User settings. Scroll to signature settings.
You can create company-wide signatures with logos, contact info, and legal disclaimers. Set them to appear on new messages, replies, or both.
Keeps your company’s branding consistent without relying on users to set it up themselves.
Mobile Device Management Made Easy
Employees check work email on their phones. You need to know which devices are accessing your data.
Go to Devices > Mobile devices to see everything connected to your Google Workspace account.
Approve or Block Devices
New device trying to sync? You’ll get an alert. Click to approve or block it.
You can set automatic approval for devices that meet your security requirements:
- Screen lock enabled
- Encryption turned on
- Minimum OS version
Or require manual approval for every single device. Your choice.
Remote Wipe (When Phones Go Missing)
Someone lost their phone? You can erase all company data from it remotely.
Find the device in your list, click it, and select “Account wipe” (removes just work data) or “Device wipe” (erases everything).
Do this immediately if a device is stolen. Don’t wait.
Reports & Monitoring: Know What’s Happening
The Reporting section tells you everything people are doing in your Google Workspace admin console.
User Activity Reports
See who’s actively using which apps. Identify inactive accounts that are wasting licenses.
Go to Reporting > Reports > Users. You’ll see:
- Daily and monthly active users
- Which apps get used most
- Accounts that haven’t logged in for 30+ days
Use this data to optimize your license spending.
Email Log Search (Track Specific Messages)
Need to find out what happened to a specific email? The email log search tool has you covered.
Navigate to Reporting > Audit and investigation > Email log search. Enter the sender, recipient, or date range.
You’ll see exactly when the message was sent, delivered, or bounced. Perfect for troubleshooting delivery issues or proving emails were sent.
Security Alerts You Can’t Ignore
Check Security > Security center regularly. Google flags suspicious login attempts, potential data leaks, and government-backed attacks.
Set up email notifications so you don’t have to remember to check. Some alerts need immediate action.
Compliance & Legal: Google Workspace HIPAA BAA How to Sign Admin Console
Running a healthcare organization? You need a Business Associate Agreement (BAA) to use Google Workspace under HIPAA.
Here’s how to sign the Google Workspace HIPAA BAA admin console:
- Sign in to your admin console
- Go to Account > Legal and compliance
- Look for “HIPAA compliance” or “Business Associate Amendment”
- Review the agreement
- Click to accept and sign digitally
You need a Business Plus, Enterprise, or Education plan for HIPAA compliance. The basic plans don’t qualify.
After signing, configure additional security settings like DLP (data loss prevention) and advanced endpoint management.
Organizational Units: Different Rules for Different Teams
Think of organizational units (OUs) as departments in your company structure. They let you apply different settings to different groups.
Create an OU for sales, another for engineering, one for contractors. Now you can give sales full access to everything while limiting what contractors can do.
Go to Directory > Organizational units. Click “Create organizational unit” and name it.
Move users between OUs by clicking their name, finding “Organizational unit,” and selecting a new one.
Settings changes can take up to 24 hours to fully take effect, so plan accordingly.
Google Workspace Admin Console Tutorial: Common Tasks Walkthrough
Let’s run through the tasks you’ll do most often.
Suspend a User (Employee on Leave) Go to Directory > Users, click the person’s name, select “Suspend user.” Their data stays safe, but they can’t log in.
Delete a User (Employee Left) Same path, but choose “Delete user.” You’ve got 20 days to restore them if you change your mind. After that, they’re gone forever.
Create a Group (Team Email Lists) Navigate to Directory > Groups, click “Create group,” and add members. Perfect for team@, sales@, or support@ addresses.
Check License Usage Go to Billing > Subscriptions to see how many licenses you’re paying for versus actually using. Cancel unused ones to save money.
Troubleshooting Common Problems
Can’t Sign In to Admin Console Google Workspace?
Getting an error that says “admin.google.com is for Google Workspace accounts only”? You’re trying to use a personal Gmail account.
You need your company email address—the one that ends in @yourcompany.com, not @gmail.com.
Emails Going to Spam
Recipients marking your emails as spam? You probably haven’t set up SPF, DKIM, and DMARC records.
Go to Apps > Google Workspace > Gmail > Authenticate email. Follow the wizard to generate the DNS records you need.
Add those records to your domain registrar’s DNS settings. This tells receiving servers your emails are legitimate.
Settings Not Taking Effect
Changed a setting but nothing happened? Most settings take 15 minutes to propagate. Some take up to 24 hours.
Clear your browser cache, sign out, and sign back in. That usually forces the update.
Google Workspace Admin Console Training: Keep Learning
Google offers free training resources at workspace.google.com/learning-center. They’ve got tutorials, videos, and best practices.
The Google Workspace admin console tutorial section covers everything from basic setup to advanced configurations.
Join the Google Workspace Admin Community too. Thousands of admins share solutions to common problems there.
Where to Buy Google Workspace: Top Authorized Resellers
You can purchase Google Workspace through authorized resellers, which often provide local support, setup assistance, and flexible billing options for businesses. Buying from a trusted reseller ensures you get professional guidance and additional services alongside your subscription.
Top 5 Google Workspace Resellers:
- Leads Monky ( Enjoy up to 64% off with promo code PARTNER2026(Redeem Here)- Plus free setup and support)
- Agosto (Save up to 10% off on Google Workspace plans with expert migration support)
- Onix (Get up to 5% off on Google Workspace with enterprise-level deployment and support)
- Cumulus Global (Enjoy up to 20% off Google Workspace plans with certified reseller support)
- GsuiteReseller (USA) (Get up to 10% off on Google Workspace plans with dedicated support)
Your Next Steps
You’ve now got the foundation to manage your Google Workspace admin console confidently. Start with these priorities:
- Enable two-factor authentication (do this first)If you want a complete step-by-step onboarding checklist to properly set up Google Workspace from initial configuration to security hardening, user setup, and best-practice deployment you can follow our Google Workspace onboarding checklist to ensure nothing is missed during setup.
- Set up DKIM for email authentication
- Configure mobile device management
- Review user licenses and remove unused ones
- Set up security alerts and monitoring
The admin console for Google Workspace gives you incredible control over your organization’s productivity tools. Master these basics, and you’ll handle most admin tasks without breaking a sweat.
Bookmark admin.google.com and check your security alerts weekly. That’s really all it takes to keep things running smoothly.
FAQs
- Why does it say “admin.google.com is for Google Workspace accounts only” when I try to log in?
You’re trying to sign in with a personal Gmail account instead of a company Google Workspace admin account. - How do I access the Admin Console if I have forgotten my administrator username or password?
Use Google’s account recovery at accounts.google.com/signin/recovery for your admin email. - What are the steps to verify my domain if the DNS records aren’t propagating?
Ensure your TXT, CNAME, or MX records are correctly added to your domain registrar and wait 24–48 hours for propagation. - How do I bulk-add hundreds of users at once using a CSV file?
Go to Directory > Users > Bulk update users, upload a filled CSV template, and confirm the upload. - What is the difference between “Suspending” a user and “Deleting” a user in terms of data and billing?
Suspending keeps data intact but blocks access; deleting removes the account permanently after a 20-day restore window. - How can I transfer a former employee’s Google Drive files to a new manager?
Use the Admin console > Users > select the former user > Transfer files to a new user. - How do I enforce 2-Step Verification (2FA) for all employees without locking them out accidentally?
Enable 2FA enforcement in Security > Authentication, give users a grace period to enroll, then make it mandatory. - Where do I find and sign the HIPAA Business Associate Agreement (BAA) for my organization?
Go to Admin Console > Account > Legal & Compliance > HIPAA, review and digitally sign the agreement. - How do I set up DKIM and SPF records to prevent my company emails from landing in spam?
Navigate to Apps > Google Workspace > Gmail > Authenticate Email, generate TXT records, and add them to your domain DNS. - How can I remotely wipe company data from an employee’s lost or stolen mobile phone?
Go to Devices > Mobile devices, select the device, and choose “Account wipe” or “Device wipe.” - Google Workspace Admin console login?
Sign in at admin.google.com using your Google Workspace admin credentials. - Google Workspace admin console settings?
Manage users, security, devices, email, reports, and organizational units from the Admin console. - Google Workspace support?
Access support via the Admin console, Help Center, or authorized resellers for guidance. - Google Workspace customer service phone number 24/7?
Call Google Workspace support at the number provided in your Admin console for 24/7 assistance.
Get Google Workspace at 64% Off
Same service. Better price. Professional setup included.
⭐⭐⭐⭐⭐ 151+ companies trust us
Partner Pricing:
• Business Starter: $3/month (Google: $8)
• Business Standard: $13/month (Google: $17)
• Business Plus: $20/month (Google: $26)
FREE:
Complete DNS setup + 24/7 support + USA IPs
15-user minimum | Setup in 24 hours