Verify Domain for Google Workspace on Porkbun takes under 20 minutes and requires just four steps get your TXT verification code from Google Workspace Admin Console, add it to your Porkbun DNS settings, wait 5 to 10 minutes for propagation, then click Verify.
No technical expertise required. In this guide, you will learn the exact step-by-step process to complete domain verification in 2026, fix the most common verification errors, and set up MX records, SPF, DKIM, and DMARC after verification so your business email works correctly from day one.
Step-by-Step Verification Process
Step 1: Get Your Verification Code from Google Workspace
- Log in to your Google Workspace Admin Console at admin.google.com
- Navigate to Account > Domains > Manage Domains
- Click on your domain name
💡 Need help setting up Google Workspace?
We’re certified Google partners offering 64% off + free professional setup ($2,000 value). Used by 151+ companies.
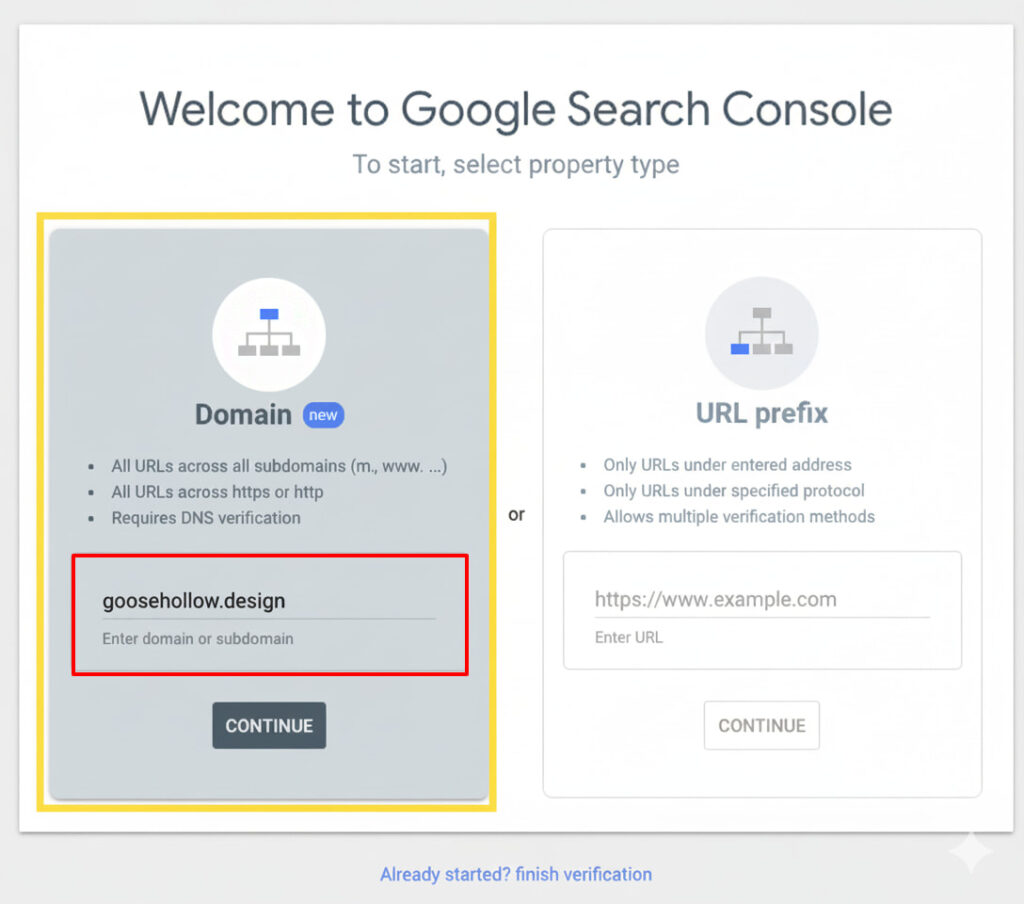
Get your quote →4. Select Verify domain if not already prompted
5. Choose the TXT record verification method (recommended)
6. Copy the verification code that looks like: google-site-verification=abc123xyz...
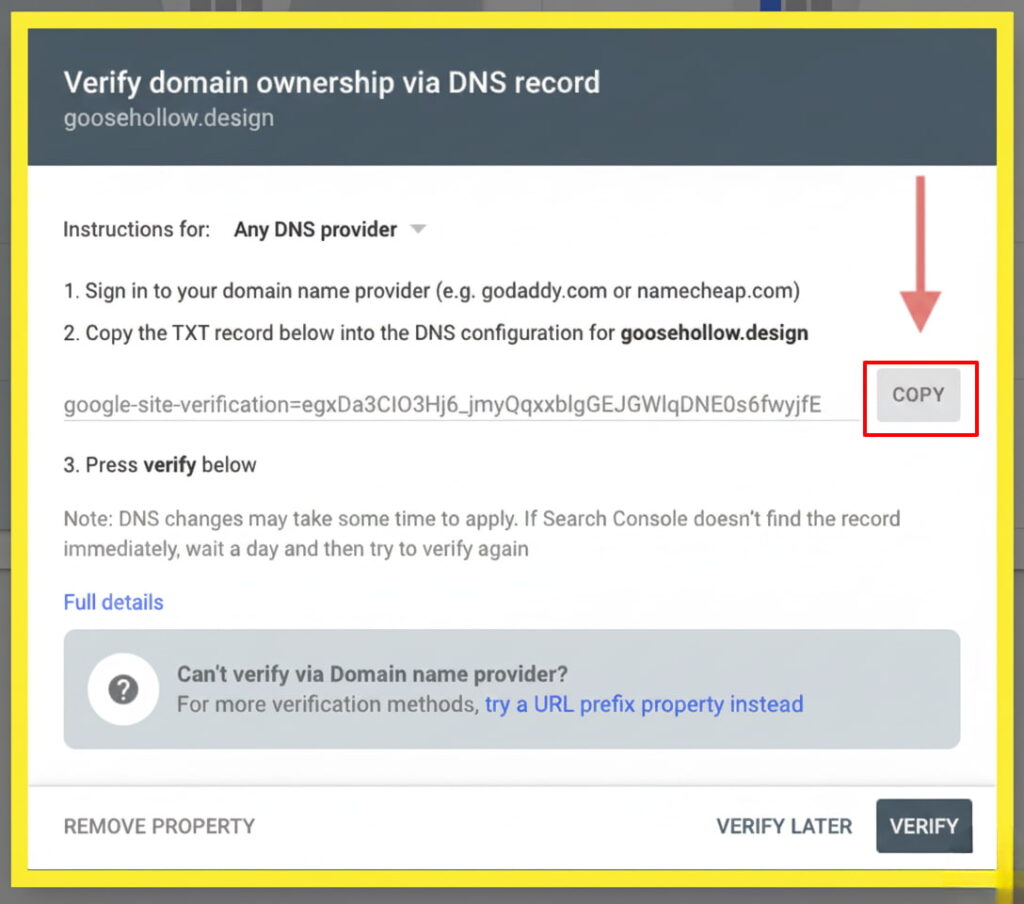
Tip: Keep this tab open – you’ll need it in Step 3.
Step 2: Access Your Porkbun DNS Settings

- Log in to Porkbun.com
2. Go to Account > Domain Management from the top menu
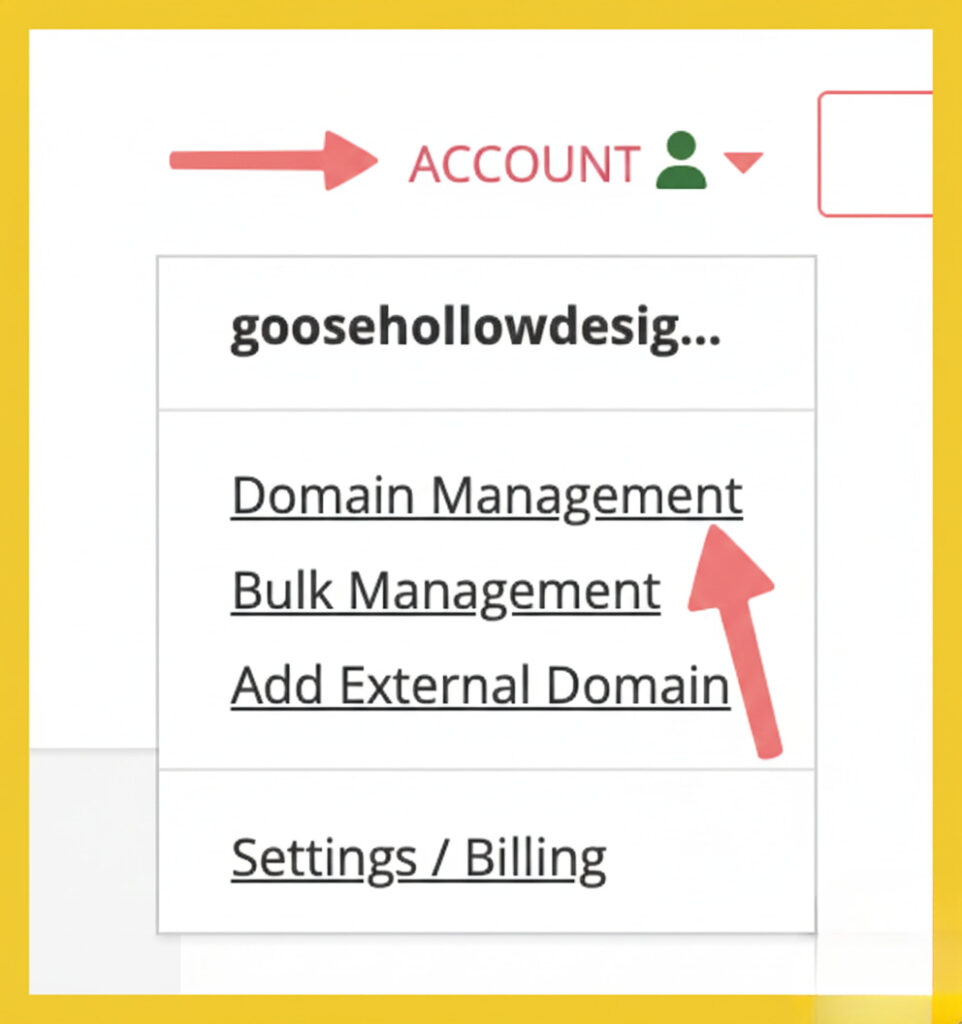
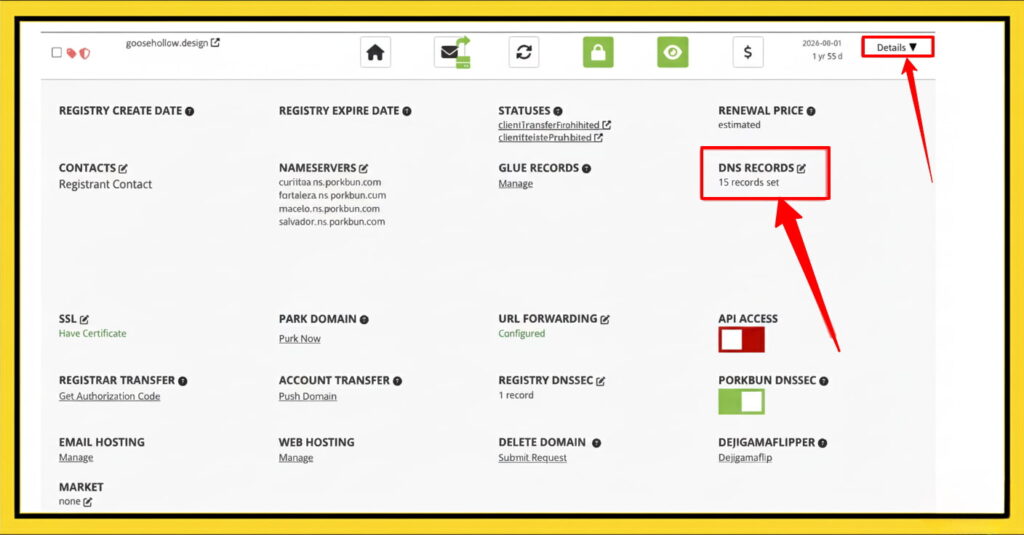
3. Find your domain and click the Details button
4. Click the edit icon next to DNS Records
Step 3: Add the TXT Verification Record
Now you’ll add Google’s verification code to your domain:
- In the DNS Records section, locate the Add New Record area
- Set these values:
- Type: Select TXT from the dropdown
- Host: Leave this field blank (or use
@if required) - Answer/Value: Paste the verification code you copied from Google
- TTL: Leave as default (usually 600)
3. Click Add or Save to create the record
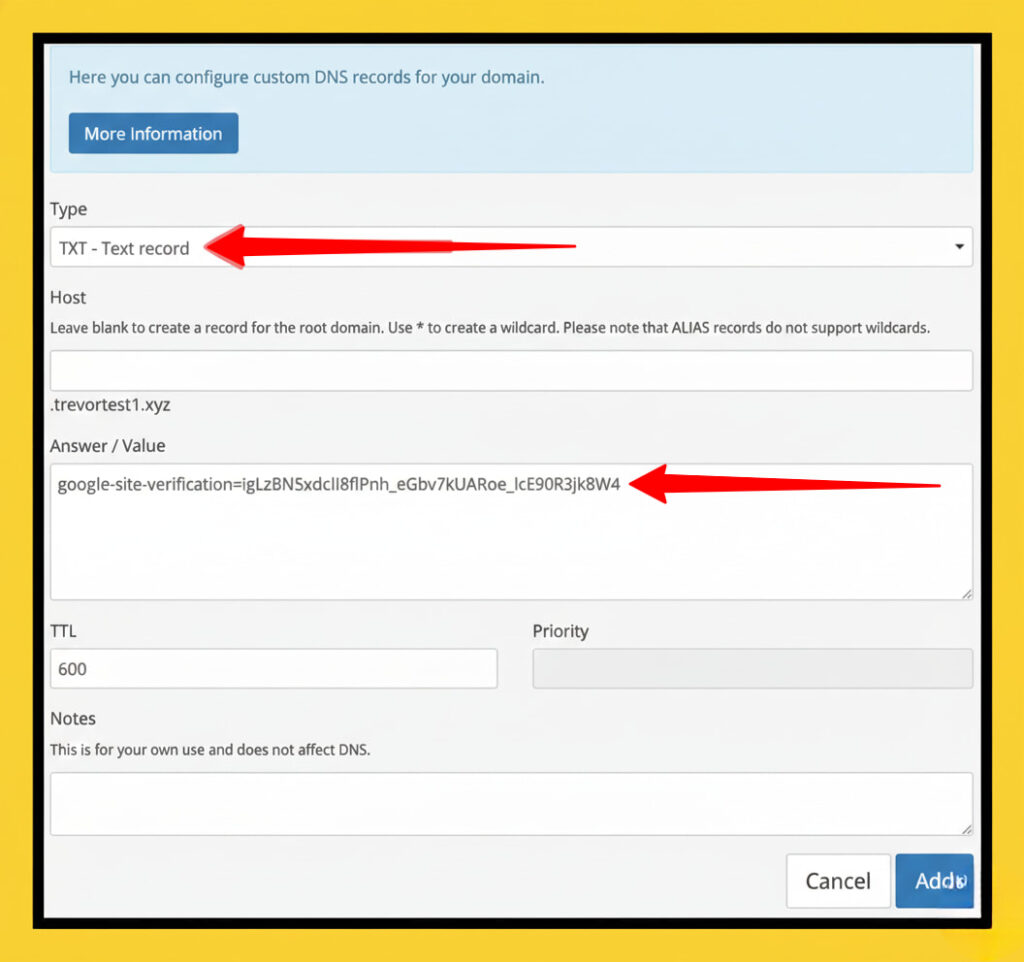
Important: Don’t add quotes around the verification code – paste it exactly as provided.
Step 4: Verify in Google Workspace
DNS changes need time to propagate across the internet. Here’s how to complete verification:
- If successful, you’ll see a confirmation message
- Wait 5-10 minutes after adding the TXT record
- Return to your Google Workspace Admin Console
- Click the Verify button
If you navigated away at any point, you can enter the domain name again or just click on “Already started? Finish verification” at the bottom of the page to review your previous settings.
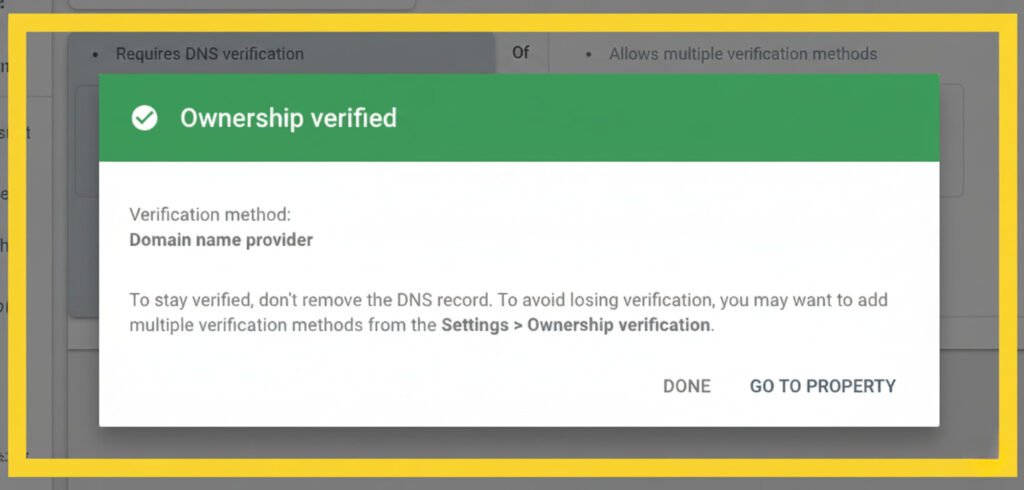
The domain was successfully verified for Google Workspace using Porkbun.
Troubleshooting Common Issues
“Verification failed” error:
- Double-check you copied the entire verification code
- Ensure the Host field is blank or set to @
- Wait longer for DNS propagation (up to 24 hours)
- Verify you’re using Porkbun’s nameservers
Can’t find the TXT record option:
- Make sure you’re editing DNS Records, not forwarding settings
- Clear your browser cache and try again
Multiple verification codes:
- Each Google service may require its own code
- You can add multiple TXT records to the same domain
What Happens After Verification?
Once verified, you can:
- Create email addresses with your domain (e.g., yourname@yourdomain.com)
- Set up Gmail for business
- Access Google Drive, Calendar, and Meet with your custom domain
- Add users to your Google Workspace account
Time estimate: The entire process typically takes 10-20 minutes, including DNS propagation wait time.
Next Steps
After successful verification:
- Set up MX records to route email to Google’s servers
- Create user accounts for your team members
- Configure email clients if needed
- Add SPF, DKIM, and DMARC records for better email deliverability
Need help with MX record setup? Check out our guide: How to Configure Google Workspace Email on Porkbun
Quick Recap: Get verification code from Google Workspace → Add TXT record in Porkbun DNS → Wait 5-10 minutes → Click Verify in Google Workspace. That’s it!
Having trouble? Contact Porkbun support or Google Workspace help for personalized assistance.
FAQS
How do I verify my domain for Google Workspace on Porkbun?
Log into Google Workspace Admin Console, copy your TXT verification code, add it to Porkbun DNS settings, wait 10 minutes, then click Verify.
How do I verify a domain for Google Workspace on Porkbun using DNS?
Go to Porkbun domain management, click DNS Records, add a new TXT record with your Google verification code, leave the host field blank, and save.
How do I verify my domain for Google Workspace on Porkbun for Gmail?
Complete domain verification first by adding the TXT record in Porkbun DNS, then add Google’s MX records to route Gmail to your custom domain.
How do I verify my domain for Google Workspace on Porkbun for email?
Add the TXT verification record to Porkbun DNS, verify in Google Workspace Admin Console, then configure MX records so business email works correctly.
How do I set up Porkbun with Google Workspace?
Buy your domain on Porkbun, sign up for Google Workspace, verify domain ownership via TXT record in Porkbun DNS, then add MX records for email.
How do I connect my Porkbun domain to Google Workspace?
In Porkbun DNS settings, add Google’s TXT verification record, verify in Admin Console, then add MX records pointing to Google’s mail servers.
How do I verify my domain in Google Workspace?
Go to Admin Console, navigate to Account Domains Manage Domains, select your domain, copy the TXT verification code, add it to your DNS provider, and click Verify.
What is the Google Workspace domain verification TXT record?
It is a unique code starting with “google-site-verification=” that you add to your domain’s DNS settings to prove you own the domain to Google.
Get Google Workspace at 64% Off
Same service. Better price. Professional setup included.
⭐⭐⭐⭐⭐ 151+ companies trust us
Partner Pricing:
• Business Starter: $3/month (Google: $8)
• Business Standard: $13/month (Google: $17)
• Business Plus: $20/month (Google: $26)
FREE:
Complete DNS setup + 24/7 support + USA IPs
15-user minimum | Setup in 24 hours